Showing posts with label DIY. Show all posts

Tuesday, February 15, 2011

Yew Street

I'm fortunate to have a husband who indulges my frequent bouts of nostalgia. I can always go for a good reminisce, and he's always right there with me. He's recently been working on a project for our patio: Building a wooden planter from scratch. He finished it this weekend. And he named it "Yew Street" after our old apartment's address. Coincidentally (or not), the bushes that he planted are yews. A nostalgic pun—this man truly holds the key to my heart.


Saturday, August 21, 2010

DIY Wedding Update

Things have been crazy busy around here with wedding planning fever. We've got 15 days until we say I do. I just wanted to share a couple of projects that we finished today.

Colouring books for the kids

I blogged about the colouring books a while back, and for a few good months progress stalled. They're pretty labour intensive, but after seeing the finished product, I know for sure that they were more than worth it. We also have princess crayons for the girls and jumbo crayons for the boys.


I used a long-arm stapler to bind the books and 3 layers of patterned japanese masking tape—polka dots for the girls, stripes for the boys—to line the spines. Our main wedding colour is eggplant, so I put a strip of solid colour over the patterned tape. If you want read more about how I made the books, check out my colouring book blog post.

Welcome bags for out of town guests

Since a lot of our guests are making the trek from Saskatchewan, we wanted to have something special waiting for them in their hotel room. We threw together a few food and drink items, a "Kristen and Luc" notepad, city activity info, map to the ceremony and reception, and a little note from Luc and me.


And as you can see, everything we do has the purple theme!

Wednesday, May 26, 2010

Birdcage card holder

DIY Wedding Project: Birdcage card holder

We found this white birdcage at Home Outfitters this weekend. I've actually been searching for a birdcage for months now, and this one fit the bill perfectly. It's large enough to fit cards from guests, small enough that it's not gawdy, an easy-to-open lid, vintage feel, part wood/part metal, and plain enough to decorate without looking too busy....


I stuck with the theme from our wedding invitations and printed a simple design on our invitation cardstock, embossed the strips on the side, lined it with ribbon and mounted it on silver cardstock. I used double sided tape to line the birdcage itself with two strips of ribbon.


These are my favourite kind of DIY Projects- they tie together the theme of your wedding decor, they're dead easy and they add a great personal touch from the couple. 

Tuesday, May 25, 2010

DIY Wedding Invitations Phase 2

DIY Wedding Project: Invitations

We're about half-way through printing all of our invitations- we ended up buying a new printer that could print with a full bleed because nobody in the lower mainland seems to have the simple capability of doing so, despite their big, fancy printing equipment. It's been a long, stressful, frustrating process, but I'm really pleased with the results.

After printing the card, we rounded all four corners.

Next was the most finicky part: running the card through the embossing machine.

I loved adding texture to the invitations...probably my favourite feature.

We used ribbon to tie in the eggplant colour because I wanted the print design to be mostly silver and black.

Once the ribbon was secure, we mounted the card on a piece of heavy, silver cardstock.

There is a lot of labour that goes into each invitation, but seeing our stack grow higher is incredibly satisfying.

We also have two 3.5"x5" cards: the RSVP card and the reception card. We haven't even started to think about printing those, and we're hoping that it will be simpler than the invitations.

Saturday, May 22, 2010

DIY Wedding Invitations Phase 1

DIY Wedding Project: Invitations

We've dedicated this weekend to finally getting our invitations done. We sent out our save-the-dates last September, and we also did those ourselves. They were pretty low-key though; the design wasn't a full bleed and there was no ribbon/embossing/tricky printing involved. And one envelope. We made sticker address labels and sticker seals for the back of the save-the-date envelopes. They were easy to print, easy to apply. The save-the-dates were a cake walk.


The invitation design, however, is a full bleed. And our printer, it turns out, is a worthless piece of junk. They've printed out sideways, crooked, half on the page, blurred...and then at one point the invitation printed out and all it said was: Screw you Kristen. From, your shitty printer.

The envelopes this time are acting as the proverbial monkey on my back. Partially my own fault. Rather than print address label stickers, I wanted to print the design directly on the envelopes as we printed the address of the guest. It won't print the return address though, not without being cut off every single time. We've tried InDesign, jpegs, pdfs and even bloody Microsoft Word. It might be the thick envelopes that are throwing off the printer. I eventually gave up and decided to use the reject address labels that I didn't like for the save-the-dates. The back of the envelopes look cute, though.


We used our custom-made stamp that I designed back in February rather than an envelope seal like we used for the STDs. I like the look, but mostly I was just excited to use the stamp for the first time on something! Printing the RSVP mini-envelopes was relatively problem-free, so that was a nice surprise.

So we currently have roughly 170 envelopes and nothing to put inside. I don't want to post any photos of the actual invitations until we have the printer issues figured out. Right now all I have to show are some poorly assembled mock-ups and an InDesign file that looks pretty bland without the embossing, ribbon and silver cardstock-backing that make the invitation complete.

Monday, April 19, 2010

If I were a flower and you were a bee...


A silly, old timey video of Kristen and Luc. Just a couple of goofballs in love.

Saturday, February 6, 2010

Have I mentioned that I'm getting married?

A few pieces of news on the wedding front! Because I don't talk about my wedding enough...

After deciding that I wanted the flower girls to carry fake flowers (less chances of them getting destroyed and something fun for the girls to keep), I found two really cute oversized spider daisies in purple. Right now the stems are about as long as the flower girls are tall, so I’m going to trim them and partially wrap them in satin. I still want to keep them quite long though - I enjoy the idea of a novelty-sized flower with tiny little four year olds. There's something clumsy and cute about it.


 I also made a design that I’m going to have made into a rubber stamp. We’re going to use it to stamp stationery, cocktail napkins, and anything else that needs a bit of love.


The next DIY plan is invitations. I’ve been putting this off because I know how much work it’s going to be. I also haven’t come up with a good enough design yet. Most likely something incorporating our bird theme, but I don’t want it to replicate our save the dates. IAnd school has been intense this term, so there hasn’t been much time to think about invitations. I’m hoping for one of those 4am revelations...I leave all of the hard work to night time Kristen.

Tuesday, February 2, 2010

What did I get myself into?

When I made the first 20-page colouring book mock-up, I was under the impression that we had about three or four little people coming to the wedding. After glancing at the guest list, I realized that it's more in the ballpark of up to fifteen. It's too late though, I've fallen in love with the colouring book idea. It must be done.

Here are a few photos of the mockup. The real ones will all be sewn (saddle stitched) with cream-coloured, heavy card-stock covers; either black or eggplant linen book tape on the spines; the little kiddy's name and a different animal on each cover.


And yes, I purposefully chose the quirkiest animals that I could find. I scanned the caricature that Luc and I had done at the wedding soiree in January and tooled it around a bit in photoshop. I'm happy with the way that it turned out - it matches the line-drawing style of the strange looking animals.

Friday, January 29, 2010

Once you start, there's no turning back

I've been consumed by the DIY wedding monster. These are some of the little things we would like to do for the wedding. It's a good thing we still have over 8 months left!

Friday, October 2, 2009

My fiance, the ass...

It's been brought to our attention that Luc and I aren't the only pair of our kind. As I mentioned a few days ago, we sent out our save the dates, and our guests have begun to peruse our wedding website. One of Luc's friend's tried to get to our website by googling our names: kristenandluc
He found a site...he found Kristen and Luc...but not the ones he was looking for. Here's my favourite highlight from the site:
"Kristin jumped on Luc giving him his first bareback experience"
And here is the site itself:
AWESOME DISCOVERY

Tuesday, August 25, 2009

The wedding factory

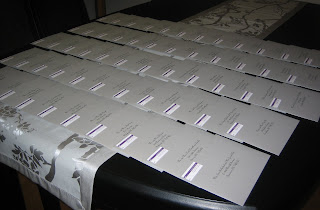
Sunday afternoon was spent finalizing the guest list and prepping our save the dates. I had to type out every single address and print them onto the envelopes one by one....by one....by one.....it was tedious and nearly drove me insane. Almost as tedious as cutting out, by hand, 90 stamps, 90 return address stickers and 90 save the date cards. Don't even get me started on the numerous paper cutter debacles or the issues with placing a finicky jpeg into an avery return address template, or the non-functionality of a mail merge using custom sized envelopes, OR the anger that can be brought on by a printer that just DOES NOT want to print things centered like they should be! Don't get me started!!! I bitch and complain, but I still love it.

I was considering asking my bridesmaids over one night this week so we could tag-team this save the date project, but I didn't want their first big bridesmaid task to be so lame! And unfortunately, these are not tasks that can be completed after consuming the requisite 5 glasses of wine involved in bridesmaid get-togethers. I'm still not done; we have yet to gather up every last address and I have about 30 more save the date cards to cut out. But here's a peek: